You probably
know how it’s annoying when one of wee switch lamps burned suddenly. It’s
damaging the look of the panel and it’s very difficult (boring) to replace/fix.
Also the quality of modern aftermarket lamps is poor so you can find yourself
doing the same fix the month after.
I found
quite a lot of lamps been broken on my dash so decided to use this chance
and to replace all of them to LEDs. This will guarantee almost eternal it’s
life, cute look and I can choose any colour I want.
There were
some discussions about how Blue leds (or any other colour) will shine through
Mazda’s green buttons. I can say that Leds are producing almost monochrome
light so you can not to worry about it changing the colour. It will light
blue if you will put blue LED (could slightly change the shade of blue – to
a bit of a violet for ex.).
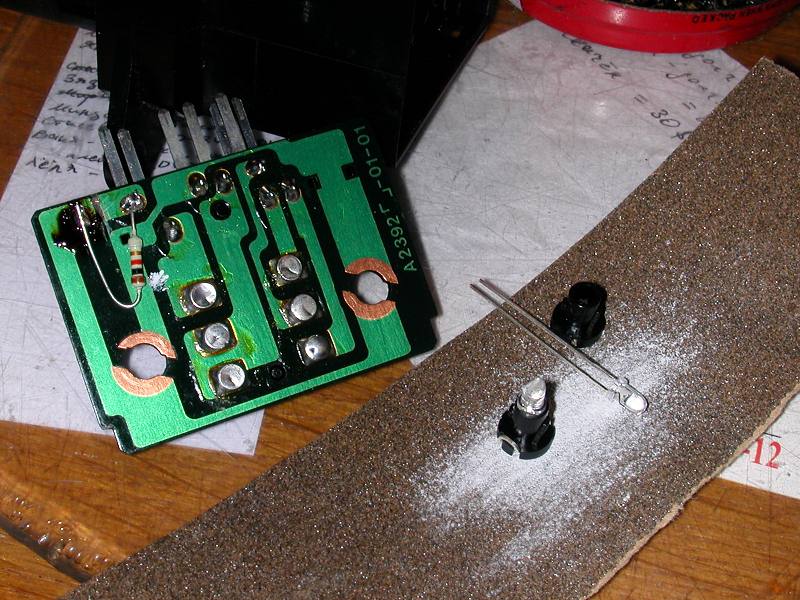
So here
is one button example on how to put LEDs into switches. Actually I found it
quite a straight forward job to do.
- First of all you will need LEDs
(use 3mm small ones), resistors approx 500 Omm -1 kO,
knife, sand paper, solder, multimetr.
- Before extracting buttons it could
be good to check and mark +U on lamp pins. You will use LEDs and they should
be placed according to voltage polarity.
- Extract all switches/buttons from
the dash.
- Disassemble them by parts. Usually
it contains the plastic body, back cover, circuit board with pins, lamp
holders with lamps (you can extract them using screw driver). Take these
all out of a switch body, don’t bother about removing
buttons itself.
- Remove the lamps from the holders.
Take a LED a stick it inside the holder and bend it pins in the same way
as it was with the lamp. Don’t bother that pins are thicker – that’s OK.
Mark +U side and cut pins excess.
- There are two types of switches
– one with the lamp pointing directly to button cover and second, with lamp
pointing up 90 deg to button cover.
- For the first type buttons you
will need to mask the LED so it would be not so bright. Use a wee piece
of white plastic and glue it from inside the button cover so LED will shine
through it and would be a bit darker.
- For the second type of buttons
you will need to point LED light 90deg to the side of a button cover. First
of all install the LED and it’s holder into the switch and ensures you have
it installed with the correct polarity. Then mark the side of a LED opposite
to the button cover. Use sandpaper and sand LED tip 45 deg. This will make
the light go up, then reflecting from the sanded side and will go to the
button cover.
- Now locate the best place on a
circuit board to place a resistor. Ensure you would be able to put circuit
board back into the switch body after this without problems. Locate the
electric wires for the lamps on a circuit board. Decide where is the easiest
place to cut one wire and solder the resistor connecting cut pins. Solder
it.
- Assemble switch back, install
the LED in holder, connect the button, check the
polarity and brightness.

That’s all.
Kira
aka Aprilia, 2005
 Mazda 323F GT